8/29/08 – Melissa the Scarf! (Stockinette Edge Treatments)
August 29, 2008 at 6:30 pm 8 comments
Another knitter/etsy seller has named a series of scarves after me! How cool is that! How it happened: we are both in etsyFAST (Fiber Arts Street Team), a group of sellers who support and challenge one another to make our shops the best they can be. This seller posted in our yahoogroup about trouble she was having with the edges of stockinette-based scarves rolling. I posted a number of suggestions to fix the problem (which I will share with you below, with pictures). The seller is iwunder, and here is the link to the first scarf in the series: http://www.etsy.com/view_listing.php?listing_id=14139850
Now, for those tips. Stockinette by its nature will curl to the back on the sides, and up or down on the top and bottom. Sometimes with wool you can block it so the effect goes away temporarily, but it’s inherent in the structure of the stitches. One of the most common ways to make a piece of stockinette lie flat is to border it with a few stitches of a more stable stitch all around the edges. Garter stitch, and garter-based patterns like seed stitch, are what is usually recommended. It works great, because just as stockinette’s nature is to curl, garter stitch just naturally lies perfectly flat. So when you border stockinette with garter stitch, it will lay flat like this:

You can get the same results with seed stitch, which may make an edge more to your liking:

Usually with garter or seed stitch, you use at least three stitches in that pattern at each end, and 4-5 rows at the beginning and end of the scarf/blanket or whatever you’re making. You can make it wider if you want, but less than three stitches and you may still get curling.
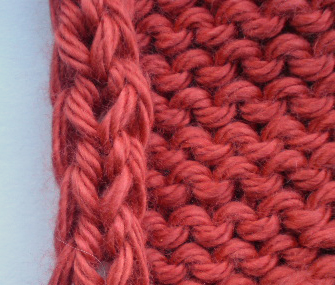
Now, here are a couple of other ways that you can get stockinette to lay without uncontrolled curling. The first way is to put an intentional ladder three stitches in from the edge. Knit your stockinette, then before you cast off, drop the fourth stitch from each edge and let it run down the length of the knitting:

Once you’ve done that, the edge should look like this (front and back shown):


If you are using wool, mohair, or a fuzzy yarn so the stitches lock into one another, that’s all you need to do. The ladder is decorative, and it should stay put. However, if your yarn is at all slick, this ladder can fill in over time as the yarn shifts and stitches loosen. So, before you use this edge, you should knit a swatch, wash it like you will the finished object, carry it around in your pocket for a few days and see if it will work with your particular yarn. For those yarns that reabsorb the ladder, or to make sure your edge effect stays put, you need to do more. One solution that might work is to twist, or knit into the back of, the stitches on either side of the stitch that will be dropped, to stabilize it. But another solution that I prefer is to do an eyelet edge. Here is a picture:

In this edge treatment, the curl is confined to the three edge stitches, which are secured by a vertical row of eyelets, so it ain’t going nowhere!! It’s easy to do: on even numbered rows, you knit three stitches, do a yarn over then knit two together. At the end of the row when five stitches remain, you knit two together, yarn over, knit three (reversing the shaping – you can use other decreases if you wish to exactly mirror the sides). The three edge stitches curl, and then the curl stops. Your edge gets a nice finish resembling I-cord, and the edge of eyelets are a nice decorative touch. This is a great edge treatment for stockinette-based lace patterns, and the back looks good too:

Now, what if you really really want the edge of your stockinette item to look as much as possible like stockinette, and still lay flat? Is there hope? Well, yes, there is – our next contender, the slip stitch edge. This is the dark horse – rarely mentioned, and a little more confusing, but the results are pretty nice:

Do you want to know how to do it? Like the others, it’s worked on the three edge stitches, but this time over four rows:
Row 1: knit one stitch, slip next stitch to right needle without knitting, knit one stitch. Knit rest of row to last three stitches, repeat k sl k.
Row 2: purl
Row 3: slip one stitch, knit one, slip one. Knit to last three stitches, repeat
Row 4: purl
Repeat these four rows for your edges. The slipped stitches get a little twist on the even numbered rows which helps hold the curl in check. These edge stitches still curl around, but with an interesting effect, in that the edge gets a nice row of stitches. Here’s how the back and side edges look:

You can do the slip stitch pattern for the first few rows and for several rows before casting off, just remember that the slipped stitches are off-set from one another on rows 1 and 3 (so row 1 is Sl, K, Sl, K, etc., and row 3 is K, Sl, K, Sl…). This makes a particularly firm edge.
I hope you’ve enjoyed my little edge tutorial! Thanks, iwunder, for the inspiration to swatch it all up and write it all down!
Entry filed under: knitting, SHOP NEWS. Tags: curling, curling edges, edging, garter stitch, knit, knitting, lace edge, no-curl scarf edge, scarf, scarves, seed stitch, slip stitch edge, stockinette, stockinette curl.
8 Comments Add your own
Leave a comment
Trackback this post | Subscribe to the comments via RSS Feed


1. knitasaur | August 29, 2008 at 9:41 pm
Great ideas in there! I’ve never thought beyond the garter-stitch edge, and these are much prettier!
2. CTJen | August 30, 2008 at 8:53 am
Very nice tutorial! I didn’t know there were so many ways to manage stockinette edge curl. I’m going to have to try some of these. 🙂
3. Not Ready for HandSpun | August 31, 2008 at 10:04 am
Thanks for all these tips! I’d write more, but I have to run off and try the dropped stitch ladder!
4. SALLY | September 21, 2008 at 3:54 pm
This is very helpful and awesome finished look.
5. Shana | September 24, 2008 at 9:26 pm
Wow! Love this post! Thank you so much for sharing….now I’ve got a few projects that could use a little of your edge magic.
6. Amaranth | November 3, 2008 at 11:36 pm
This is so helpful. I want to try the seed stitch but I must learn what it is lol.
7. Glasgow Smile | November 15, 2008 at 4:29 pm
Thank you for the original ideas. This will come in handy.
8. Mary Anne Fl. | November 14, 2010 at 9:12 pm
This blog entry is AMAZING and I will try out all of your solutions. I am knitting a bulky multi-yarn scarf as I type this, and don’t like the curl I am getting. I couldn’t have found this at a better time…Thanks for sharing!!