Posts tagged ‘knitting’
New Year – New Group!!
For a long time, I’ve been wishing for a knitting/fiber arts group in my town. On ravelry.com, I’ve connected with several other people who expressed an interest. Last week, I decided that with the New Year, one of my goals would be to stop waiting for “someone” to get something started, and take action! So I picked a place, announced a date and time, and spread the word to people I thought might be interested (and – duh – this morning realized that I should have put it in my blog too!). So today was the day, and here we are: That’s me standing the in back. The other members in attendance – most of whom I met on ravelry.com, are craftyashley, mamabeth, lamplighter777, and ontiptoe, and taking the picture, ontiptoe’s friend and new knitter, CB. Oh, and I’m wildharefiber.
 We met, chatted, worked on projects for a couple of hours. Here are lamplighter777’s socks, which she is knitting up from some of her very first handspun (she claims she’s just been knitting a year – I am SO impressed!).
Mamabeth and I both have etsy shops – she is beth1818 – here’s a link to her site: http://www.etsy.com/shop.php?user_id=5787123 – it was nice to meet and talk shop! Craftyashley is both a new knitter and a new mother, and brought her sweet, sleeping baby girl along. Ontiptoe and I met online only to discover that her daughter and my son were in the same class at school and at the time, sat next to each other! It’s the internet fun!
There were several other potential members who weren’t able to come this time, so we’re hopeful that the group will grow and florish. If you’re near Front Royal Virginia and would like to join us, we’d love to welcome you! Send me a message and I’ll add you to the list and let you know the time and place of our next meeting.
Published!
Today’s mail brought the winter 2008 issue of Knitter’s Magazine… inside of which you will find my very first PUBLISHED KNITTING PATTERN! Yes! It is the Arabesque Tote, pictured on page 69, with directions on page 70 (here’s a quick picture of the pages:)

You can also go to the Knitter’s web site and take a look at a better picture of the bag:
http://www.knittinguniverse.com/flash/knitters/GalleryDetail.php?IssueNum=93&ID=7550
Or take a look at a picture I snapped before sending it off to them:

The body and handle of the bag is knitted with two strands of wool and wet felted in the washing machine. The swirling designs are needle-felted onto the bag afterward, using the same varigated yarn used to make the handle. It seems like forever since I submitted my design idea (it was June) and wrote the pattern and knitted the sample bag (that was back in early August). But magazines work well in advance. In fact, I’m working right now on the model for another pattern for the summer 2009 issue of Knitters! Too soon to reveal any details, but I will say despite the bitter cold outside, I’m knitting with pretty pastel cotton/silk yarn!
Before I submitted the design for this bag, I made one for myself, but in a different colorway and with a different yarn than the very nice Mountain Colors kettle-dyed and handpaint yarns that Knitters provided for the model. My prototype bag won a blue ribbon at the 2008 Virginia Fall Fiber festival. Topic for another day: pictures of this bag in my original colorway, and instructions on how I put a lining in it!
ASJ – Progress Report
It’s been a week since I started on my Adult Surprise Jacket as part of a ravelry.com knit-along, and here is how it’s going so far:

I’m knitting on size 6US needles, at a gauge of 5 stitches/inch… which means I started by casting on 440 stitches! I’m using Berroco Peruvia that I bought this summer at a clearance sale, along with a large mystery skein that was in my stash that is also a single-ply yarn of the same gauge. I only had three colors of the Peruvia – taupe, light yellow-green and teal – and the silver-grey mystery yarn:
 I could have made it with just these colors, but I really wanted to warm it up, and have a wider variety of autumn tones and shades that would go with more things. So, I overdyed some of the skeins until I had this variety of colors:

I used Jacquard acid dyes, which are what I use when handpainting yarns or rovings, but to get a solid color the yarn is submerged in the hot dyebath, with the vinegar added after the yarn has absorbed the color evenly. When overdyeing yarn, keep in mind the the dye color is going to act like a transparent veil over the orginial color of the yarn, so you are limited in what colors you can acheive. Below are pictures showing the original color of the yarn on the bottom, with the new shades at the top:


The taupe was overdyed in chestnut (left) and salmon (right), creating a chocolate brown and a light rust. The light yellow green overdyed in a weak salmon dyebath made olive (left), and in a turquoise dyebath, it became a truer green. The silver was overdyed in navy, for a dark steel blue, and chestnut, or a warm gray. The teal skeins were all left teal.
Acid dyes are easy to use on wool and other protein fibers, and when done correctly, the dye completely binds with the fiber or yarn and “exhausts” from the dyebath, leaving colored yarn and clear vinegar-water. Thus, in a multicolored project like this, you don’t have to worry about the colors bleeding later when the garment is washed. So you can have all the colors you want!
Do you know this Woman?
 If you recognize her immediately, good for you! If not, and you have any interest whatsoever in knitting, then please let me introduce you right away! Although she now is with us only through her books, videos, patterns and “children,” she still has so much to teach! I’m talking about Elizabeth Zimmermann, knitting heroine. She guided knitters gently into a new, free, creative way to approach our knitting, and I personally believe she planted the seeds that have lead to the current flowering of creativity and innovation in patterns and knitting techniques. Without Elizabeth’s guiding light, today’s growing ranks of avid, excited knitters would be doing something else. Perhaps getting into all kinds of unsavory mischeif. Anyway…
I was fortunate to encounter Elizabeth’s writings when I was still a young and impressionable knitter who just couldn’t stop changing things in the patterns I was trying to follow. She gave me the license to change away, and more. And now, 20 or so years later, I still find her writings and patterns to be fresh and knitable.
One Elizabeth Zimmermann classic is the Baby Surprise Jacket. It is knit all in one piece, in garter stitch, and is a puzzle of sorts in that as you are knitting it looks rather like a misshapen blob. But trust Elizabeth, and in the end, a few folds and two simple seams, and you have a lovely little jacket:

This one (which I did years ago) is made of handspun merino and angora, and I keep it with my spinning samples for demonstrations just to show people how soft handspun can be. I’ve made others… none handy to photograph. This little jacket was (and has been) so popular, that Elizabeth eventually gave into demand and created an adult-sized version, known as the Adult Surprise Jacket. (ASJ)
The ASJ has long been on my “to do” list, and this summer I went so far as to go though my stash and pick out some yarns that I thought would work. This is a wonderful project for using up left-overs, odd-balls, yarns that just never got used. Elizabeth once suggested to pick one yarn to match every blouse you owned so that the sweater would match everthing in your wardrobe. I think it would also be a great pattern for using your handspun (or combining handspun with commercial yarns). Her instructions guide you in how to make the sweater to the correct size regardless of what gauge you are knitting at — so any yarn you like can be used for this pattern.
So, anyway, I was already planning to make an ASJ this fall, and then today on ravelry (if you haven’t heard of it, go to ravelry.com and request to join –another knitter thing!) I discovered a group of fellow Elizabeth Zimmermann “children” who were getting ready to do a knit-a-long of the ASJ… starting TODAY! I took it as a sign… time to get out those needles and yarn and get started! Anyone want to join in?
Here are the yarns I’m thinking of using (unless I decide to switch to handspun). I’m working from a version of the pattern that appeared in Knitter’s Magazine issue 60 (Fall 2000), which is already drafted for a gauge of 4 st./inch. The instructions are also in her books “Knitting Workshop” and “The Opinionated Knitter”, as well as being available individually from Schoolhouse Press (www.schoolhousepress.com), the publishing company that she founded with her daughter Meg Swanson (another knitter/designer extraordinaire!) Time to go get needles and get started!
Button, button, who’s got a button…?
I do! I just put a bunch of fiber-themes badges in my etsy shop. They’re also available as magnets. Lots of fun sayings —


 copyright wildharefiberstudio 2008
That’s just some of them – the rest are in my store. Check them out!
Oh, and if you have an idea for a fibery button that you don’t see here, let me know. If I like it well enough to design and add to the collection, I’ll send you a button or magnet in that design, free! Just send your e-mail, with contact info, to melissa@wildharefiber.com.
Finer Spinning
Over the last few days I’ve been spinning up a few ounces of wool from roving that I dyed turquoise with touches of indigo and brown. For the fun and challenge of it, I decided to spin fine, aiming for a yarn that would meet the criteria for the Fall Fiber Festival’s laceweight handspun category.(http://www.fallfiberfestival.org).
Here is my yarn:

It’s two ply, with 460 yards in the skein, and weighs about 2 1/2 ounces. I spun it on my Schacht Matchless, equipped with the high speed whorl and bobbin. It’s not perfect yarn, and I might be able to spin even finer if I put my mind to it, but I wanted a yarn I would be willing to knit with, and much finer than this, it gets hard for me to see what I’m doing! Also, I didn’t want to completely loose the color variations in the roving.
You don’t have to have high-speed attachments or years and years of spinning experience to spin yarn that could be considered “laceweight” (which is, after all, a category that includes everything from frog hair to just under fingering weight!). But it does take a while. The thinner your yarn, the more twist it needs to hold together. To get more twist, you either use a high ratio, or treadle faster and reduce the pull-in, so the fiber you are drafting has enough time to get sufficient twist before being wound onto the bobbin. Fine singles take a lot of twist, and can also fool you sometimes, in that they can have just enough twist to wind on the bobbin, but fall apart later while being plied. So the first thing to do for spinning a fine singles is to set up with the highest ratio you have available, and figure out how fast you have to treadle, and how little draw you need, to get the yarn to spin with sufficient twist and wind on the bobbin with ease.
You should also pay attention to the fiber you are using, and how it is prepared. While shorter staple lengths are ideally spun fine, if you’re new to spinning lace weight yarns, it will be easier to draft and get good results with a medium-long fiber. Likewise, stay away from slippery fibers to begin with, and make sure your prepared fiber is smooth and free of neps. I used an ordinary, relatively soft but not slippery all wool roving and found it easy to work with. To make drafting go smoothly, I first separated it into smaller, pencil-sized lengthwise strips, like this:

Then I began to spin. You have to train yourself to go slow, and to draft only a few inches at a time and allow plenty of twist to build up before you let the yarn wind on. Check your newly spun singles from time to time to make sure you’re keeping a consistent rhythm (let them ply back on themselves before going through the orifice. ) Here you can see my drafting zone:

And that’s how it’s done… slowly, patiently. Relax. unwind. You’ll get there… just don’t forget to move the yarn on your flyer hooks regularly so it winds on your bobbin evenly (’cause it can really be a problem to unwind if you don’t). For two-ply, you can spin half your fiber on two different bobbin, or do it the hard way and spin it all on one, like I did. You’ll notice there’s still some room on the bobbin when I stopped spinning last night:

That’s because plied yarn always takes up more space than singles, and I wanted to make sure I could get the two-ply back on this bobbin. After I took this picture, I wound the yarn into a center-pull ball on my yarn winder, tied the two ends together, and called it a day.
Today I plied. If you’ve never plied from both ends of a center pull ball, practice with thicker yarn before you try it with lace, as the singles yarn is energized (i.e., has a lot of twist in it), and you have to keep on top of it to avoid making a kinky tangled mess. But that’s how I did it (I like not having any orphan singles left on a bobbin, and I’ve plied this way for years). Here is the full bobbin of two-ply:

See how it’s fuller than the singles? Same fiber, same bobbin, just more air space in yarn that has been plied. So when I was done I wound it into a skein and soaked it in warm water to set the twist. Here is a close-up picture of the yarn with a penny so you can get an idea of the scale:

And that’s it – my “laceweight” yarn. Though with less than 500 yards, I’m not sure what I’m going to be able to knit with it. I’ll have to check yardage on lace shawl patterns and see what I can come up with. But first I’m sending this skein in for the fiber festival!
9/4/08 – Lluscious Llovely Llama Yarn!
Back last spring, a mutual friend introduced me to a man raising a small herd of llamas in Shenandoah county who was interested in turning their fiber into yarn. I’ve been helping him with the process, and just today, the resulting yarn has been added to my etsy shop! (link to the right). There are five colors (all natural, no dye) all spun to a light DK weight. Most llamas have a “double coat” with longer, coarser guard hairs mixed with their otherwise heavenly soft downy coat, so before spinning, we had the mill “de-hair” the fiber so only the soft stuff ends up in the yarn.
Llama fiber is not crimpy like wool (nor is it oily). It is lustrous and silky-feeling, and insulates wonderfully (I’ve heard that it’s warmer than wool). It’s a great fiber for lace knitting and items like shawls and scarves, because it drapes beautifully. Can’t you see an icelandic or “old shale” lace stole in these colors! This range would be great for fair isle knitting too…
Here are some pictures for you:


9/1/08 – How about Handspun, Odd-Balls and Garter Stitch?
A few days ago I showed off a simple scarf idea developed for my daughter, made with just the chain stitch in crochet. But what if all you know is how to knit… meaning, just the knit stitch. We all start that way. Many of us (me! me!) like to have a simple garter project going, for those times when we just need to knit but don’t want to think (or want to be simultaneously talking, or watching something). I call this my Little League knitting, but I digress…
It’s not all that hard to come up with garter stitch projects, actually. My heroine, Elizabeth Zimmerman, taught us all the great versatility of this humble stitch. But maybe you also have a lot of small random yarn leftovers stuffed in the nooks and crannies of your house… or perhaps you have an assortment of little bits of handspun, either beginner yarn, or those pesky sample skeins. Did you get overly enthusiastic about sock knitting and have a gazillion skeins calling for size 2 needles? Lets throw it all in pile and make something of it, shall we?
Start making piles by color, or by colors that go well together (check a favorite printed fabric for inspiration). Don’t bother with the weight of the yarn, although do give some consideration to whether or not the fiber will wash/wear well together, and slip those poor bedraggled skeins of discount-store acrylic into the charity box while you’re at it. When you’ve got a nice little pile of yarns that seem to go together, get out a big fat long circular needle and cast on. I used a size 15, and cast of 100 stitches for a scarf and 150 for a shawl. In both cases, I left a long tail on both edges, and changed yarn every row. Yes, EVERY row. You could plan a color progression, grab balls at random, or however you like. I tried to frame bulky yarns with thinner ones so the bulky ones stood out, and I freely mixed handspun with commercial yarns. You can double or triple yarns if you want, but the yarns on the different rows don’t have to be near the same thickness for the item to work – in fact, the different weights add visual interest. Here is what resulted:
 That’s a shawl – all animal fiber yarns, some handspun, and weights between lace and bulky. Here’s the same idea done as a scarf:
 As you can see, I tied groups of yarn ends together with an overhand knot to make the fringe. Oh, and another trick to help stabilize the edges as I knitted it: on each row, I knit the second stitch from the edge first, then the first stitch. You could also twist the first couple of stitches, or even up the tension in your edges and tie the fringe every few rows. Combine yarns to your heart’s content, and people will think you used some fancy designer yarn instead of your old leftovers.
I made these a while back, but I though this would be a good day to share the idea. Summer is Officially Over (though the equinox is still ahead) and as we all get back to school/work and pack away the swimming suits, it’s time to look ahead to winter, and the holidays. Surely someone on your gift list would benefit from a scarf, shawl, lap blanket or afgan made it this technique? And if you use up all those odd-balls in your stash, it will be easier to justify buying more yarn/spinning fiber for the new year.
Ak – did I say the words “new year” on Labor Day??
8/29/08 – Melissa the Scarf! (Stockinette Edge Treatments)
Another knitter/etsy seller has named a series of scarves after me! How cool is that! How it happened: we are both in etsyFAST (Fiber Arts Street Team), a group of sellers who support and challenge one another to make our shops the best they can be. This seller posted in our yahoogroup about trouble she was having with the edges of stockinette-based scarves rolling. I posted a number of suggestions to fix the problem (which I will share with you below, with pictures). The seller is iwunder, and here is the link to the first scarf in the series: http://www.etsy.com/view_listing.php?listing_id=14139850
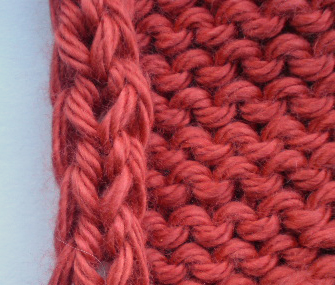
Now, for those tips. Stockinette by its nature will curl to the back on the sides, and up or down on the top and bottom. Sometimes with wool you can block it so the effect goes away temporarily, but it’s inherent in the structure of the stitches. One of the most common ways to make a piece of stockinette lie flat is to border it with a few stitches of a more stable stitch all around the edges. Garter stitch, and garter-based patterns like seed stitch, are what is usually recommended. It works great, because just as stockinette’s nature is to curl, garter stitch just naturally lies perfectly flat. So when you border stockinette with garter stitch, it will lay flat like this:

You can get the same results with seed stitch, which may make an edge more to your liking:

Usually with garter or seed stitch, you use at least three stitches in that pattern at each end, and 4-5 rows at the beginning and end of the scarf/blanket or whatever you’re making. You can make it wider if you want, but less than three stitches and you may still get curling.
Now, here are a couple of other ways that you can get stockinette to lay without uncontrolled curling. The first way is to put an intentional ladder three stitches in from the edge. Knit your stockinette, then before you cast off, drop the fourth stitch from each edge and let it run down the length of the knitting:

Once you’ve done that, the edge should look like this (front and back shown):


If you are using wool, mohair, or a fuzzy yarn so the stitches lock into one another, that’s all you need to do. The ladder is decorative, and it should stay put. However, if your yarn is at all slick, this ladder can fill in over time as the yarn shifts and stitches loosen. So, before you use this edge, you should knit a swatch, wash it like you will the finished object, carry it around in your pocket for a few days and see if it will work with your particular yarn. For those yarns that reabsorb the ladder, or to make sure your edge effect stays put, you need to do more. One solution that might work is to twist, or knit into the back of, the stitches on either side of the stitch that will be dropped, to stabilize it. But another solution that I prefer is to do an eyelet edge. Here is a picture:

In this edge treatment, the curl is confined to the three edge stitches, which are secured by a vertical row of eyelets, so it ain’t going nowhere!! It’s easy to do: on even numbered rows, you knit three stitches, do a yarn over then knit two together. At the end of the row when five stitches remain, you knit two together, yarn over, knit three (reversing the shaping – you can use other decreases if you wish to exactly mirror the sides). The three edge stitches curl, and then the curl stops. Your edge gets a nice finish resembling I-cord, and the edge of eyelets are a nice decorative touch. This is a great edge treatment for stockinette-based lace patterns, and the back looks good too:

Now, what if you really really want the edge of your stockinette item to look as much as possible like stockinette, and still lay flat? Is there hope? Well, yes, there is – our next contender, the slip stitch edge. This is the dark horse – rarely mentioned, and a little more confusing, but the results are pretty nice:

Do you want to know how to do it? Like the others, it’s worked on the three edge stitches, but this time over four rows:
Row 1: knit one stitch, slip next stitch to right needle without knitting, knit one stitch. Knit rest of row to last three stitches, repeat k sl k.
Row 2: purl
Row 3: slip one stitch, knit one, slip one. Knit to last three stitches, repeat
Row 4: purl
Repeat these four rows for your edges. The slipped stitches get a little twist on the even numbered rows which helps hold the curl in check. These edge stitches still curl around, but with an interesting effect, in that the edge gets a nice row of stitches. Here’s how the back and side edges look:

You can do the slip stitch pattern for the first few rows and for several rows before casting off, just remember that the slipped stitches are off-set from one another on rows 1 and 3 (so row 1 is Sl, K, Sl, K, etc., and row 3 is K, Sl, K, Sl…). This makes a particularly firm edge.
I hope you’ve enjoyed my little edge tutorial! Thanks, iwunder, for the inspiration to swatch it all up and write it all down!


Recent Comments